Are you looking to take your pictures to the next level? It’s hard to take a good photo. The modern era of iPhones and digital cameras has made it so that everyone can become a photographer.
Finding the right techniques and tricks to use with Photoshop can help you to create better photographs. Check out our guide below for some simple Photoshop techniques that you can use to improve your photos.
Crop Your Photos
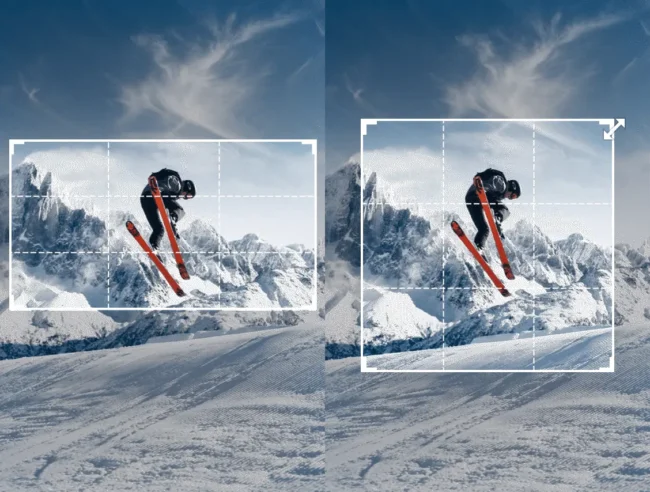
When cropping your photos in Photoshop, there are a few things to keep in mind to ensure you’re getting the most out of your photos.
When choosing which area to crop, think about the composition of the photoshop techniques and what will make it the most visually appealing.
Zoom in close to your photo so you can see exactly what you’re cropping out, and make sure to crop out any unwanted areas. Once you’ve cropped your photo, check the size and resolution to make sure it’s still high quality.
By using image editing software “background remover” on adobe.com, you have to unleash your creativity with photo editing capabilities and design tools. Add a shape crop to frame your newly cropped photo for a dynamic design.
Play With the Brightness and Contrast
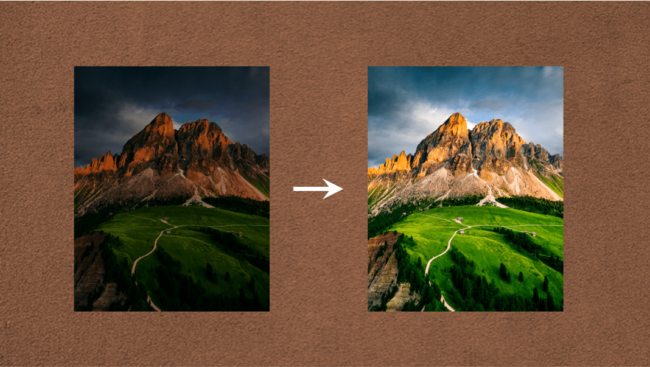
One of the simplest ways to adjust brightness and contrast is to use the Levels tool on websites like InPixio.
This tool allows you to make global changes to the lightness and darkness of your image. The disadvantage of this method is that it can sometimes result in your image looking washed out or overly contrasty.
If you want more control over your brightness and contrast settings, you can use the Curves tool.
This tool allows you to make very precise adjustments to the lightness and darkness of your image. The only downside is that it can be a bit tricky to use if you’re not familiar with it.
You can also adjust the brightness and contrast of your image using the Exposure and Contrast settings in the Adjustments panel.
These settings give you a lot of control over how your image looks, but they can be a bit confusing to use if you’re not familiar with them.
Use Adjustment Layers
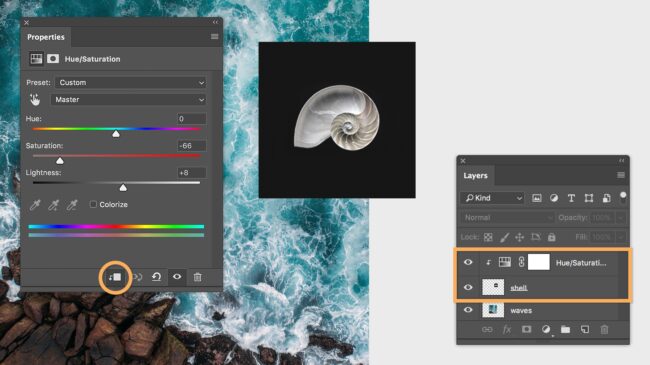
One of the best ways to improve your photos in Photoshop editing is to use adjustment layers.
Adjustment layers allow you to make changes to your image without permanently altering the pixels. This means that you can always go back and change the settings if you don’t like the results.
There are a variety of different adjustment layers that you can use to improve your photos. You can use a levels adjustment layer to improve the contrast of your image. Or you can use a hue or saturation adjustment layer to change the colors in your image.
If you’re not sure how to use adjustment layers, there are plenty of tutorials online that can help you out. Once you start using them, you’ll be surprised at how much they can improve your photos.
Improve Texture

Texture and contrast play a big role in the look of your photos. Here are some simple Photoshop techniques to help you improve both texture
One way to improve texture is to use a high-contrast filter. This will create a more striking difference between the textures in your photo. To do this, open your photo in Photoshop and choose Filter > Blur > Gaussian Blur. Enter a value of 3 or 4 pixels and click OK. This will create a slightly blurred effect that will increase the contrast between different textures in your photo.
Another way to increase texture contrast is by using gradients. To do this, first, open your image in Photoshop and choose Filter > Render > Gradient Map. Select the gradient type (linear or radial) and enter the start and end points for the gradient—you can also adjust the gradient’s angle if you want. Click OK to apply the gradient, then let Photoshop work its magic! You’ll see that the increased texture contrast makes for a more pleasing picture overall.
Fix the lighting

If you’re having trouble getting the lighting in your photos to look right, you’re not alone. Lighting can be one of the most challenging aspects of photography to get right, and it can often be difficult to fix problems once they’ve been created. In
.One of the first things you’ll want to do when fixing lighting problems is to check your exposure. Make sure that your photo is properly exposed by checking the histogram and making any necessary adjustments. You may also need to adjust your shutter speed or ISO if your photo is too dark or light, respectively.
Next, you’ll want to adjust your camera’s ambient light mode. This will help compensate for any lost light due to low ceilings or other areas that are not providing natural illumination. If you’re using a DSLR, try setting the camera on aperture priority (Aperture set to a small number such as f/8) and adjusting the ISO setting based on what kind of lighting you’re working with. If you’re working with a mobile device, turn on automatic light detection and try adjusting your exposure accordingly.
Once you’ve adjusted your exposure and ambient light settings, it’s time to start tweaking your lights! There are a variety of different ways to adjust lighting in Photoshop, so experiment until you find a technique that works best for your image.
Read More About Photoshop Techniques
If you want to improve your photos, there are some photoshop techniques using adjustment layers in Photoshop. They are a great way to make global changes to your image without affecting the underlying image data.
This means you can experiment with different settings and revert back to the original image if you don’t like the results. So why not give them a try?
Did you find this article informative? If so, then be sure to check out the rest of our blog for more!