The purpose of a floor plan is to illustrate the outline of a property and to give you a sense of what your home is going to look like. It is used to outline home interior and garden areas, helping you to plan your home improvement and remodeling projects.
It offers an overall view of the home design, including measurements and technical information, to assist with your project management. The best part about it is that you can try out some sketches yourself, with the right tool that is! If you want to know more about it keep on reading!
Why you should have a floor plan?

There are many good reasons to draw floor plans before starting a construction project. If you are working with an architect, here is what they’re going to say about the perks and benefits of floor plans:
- Floor plans can turn your concept into a realistic vision – you will get a bird’s eye view of the dimension lines and measurements.
- You can adjust your planning – floor plan designs let you see what’s possible in the space you have.
- You are saving your resources – the more details you include in your plans, the better! In fact, you will have a more effective building process + you will be well-aware of your options, limits, and budget from the get-go.
What does a floor pan need to have?
Do you plan on creating an apartment, home, or office space? The thing is, having a vision is key for making any of these spaces work. Your print should have:
– Detailed out bedrooms, hallways, and garage/basement
– Each room should be drawn out
– Room layouts per floor
– The location of doorways and other entryways
-Some room features (electronics-related mostly)
What are the 4 different kinds of floor plans?
There are a few types of house plans available depending on the type of home you’re building or remodeling. You will run into:
- A) Ranch style – perfect for one-story homes.
- B) Cape cod – is a farm ranch, for one and a half-story homes.
- C) Two-story – for a two-story home.
- D) Multi-level – it has split levels and high ranches.
Where does your home fall in when it comes to these categories?
How to Create and share floor plans in 4 easy steps
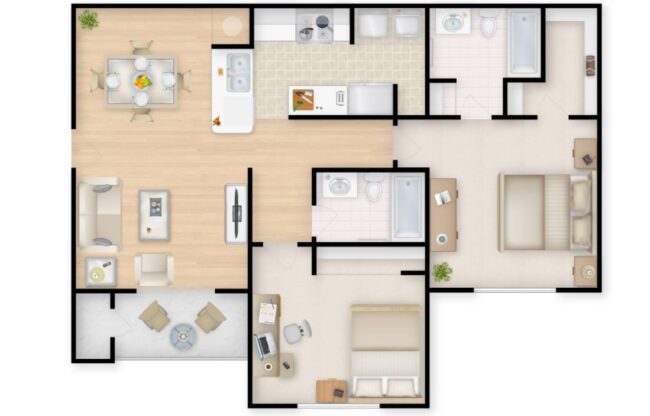
Start out easy and with a 2D floor plan

Start by creating the outline of your floor plan. You should initially focus on the walls and insert windows and doors. If you’re creating a floor plan for an existing building, take accurate measurements of the space.
To start, you’ll need to know the type of floor plan you want to create. Is it for a single room or an entire floor layout? If you’re doing an entire building, each floor should get its own new plan design.
Furnish it in 2D
Once your outline creation is done, now is time for you to do flooring and wallpaper. Talk about different color options with your spouse, and add the finishing touches by inserting a selection of decorative items such as rugs, mirrors, curtains, and plants. You can easily and simply drag and drop your favorite piece into a program. This part is the best and most fun for exterior and interior lovers.
Furnish in 3D
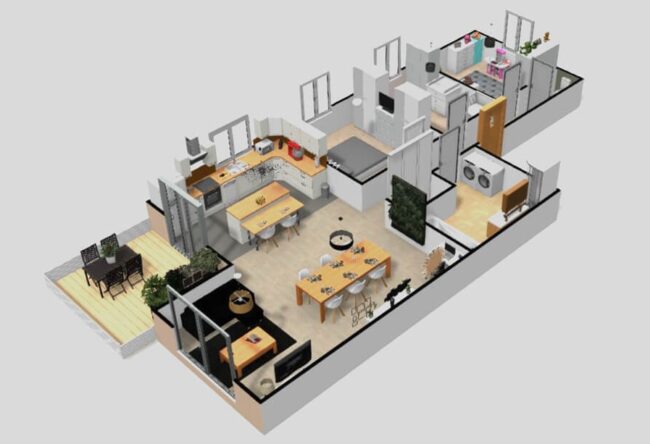
Visualizing your plan is the most fun part for a lot of people. You get to select furnishings from a range of brand-name or generic products. Some people even use VR sets to see everything come to life so that they can have a better understanding of what works, and what doesn’t. If you own a VR give this a go and see what you really fancy and what you dislike in your creation.
Share your images
Once you’re satisfied with your final design, you can go for your project in 2D or 3D form. Print it out and share it with your friends or let the world see it online and on social media. Send your project link to partners, so they can take a 3D virtual tour of the property. The creating process doesn’t take more than 2 hours to do and is well worth your time.
Top 3 practical tips
#1: Always start in pencil: do not be too hard on yourself, and rather start slow and steady to have it all drawn out cohesively. You can use graph paper to help guide your designs more precisely. Do not rush this process, and be patient with it.
#2: Use shorthands: go for the correct markings, abbreviations, or symbols for your floor plan. For instance, mark your exterior walls with darker, thicker lines than your interior walls. The toilet is marked with “WC” and “HW” stands for “hot water”. Everything will run smoothly and quickly with this approach + you will get the right vision for your home.
#3: Watch out for the windows: we all want a bit of that natural light, right? You’ll need to know whether your windows are north-, east-, south-, or west-facing because it can make a big difference in how the room looks. No one wants a dark and gloomy room, so take your time to do the drawing properly.
Ready to create your own floor plan?
Since now you know all there is, are you ready to give it a go? Want to test out your creative and architectural skills? If so, you will need ”the one” floor plan creator. Drawing up these floor plans can be as complicated or simple as you like them to be.
So, what is your preferred style? Either way it may be you should check out foyr.com since they have reviews on the top 10 best floor plan creations (free and paid), meaning that they will narrow down your choice and help you pick out something that works best for you! Check out their personal favorite if you are interested in fast and easy floor plan designing.